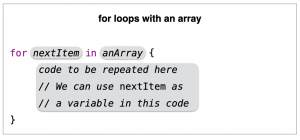
We’re going to practice using arrays. One of the first things we’ll do is iterate over items in an array; just like you would with items on a to do list, or a shopping list.
For this we’ll be using our for loops quite a bit and working within our repeating block.
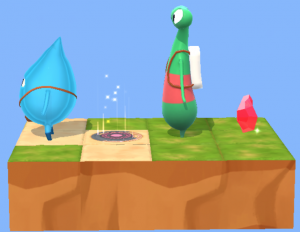
We’ll also keep other things in our arrays, like characters, gems, and portals.
Arrays are yet another super useful tool in our coding toolbox. They have a ton of interesting functionality and features, and we’ll get to explore some of that today.
We’ve covered while loops the last few days, which are ways to repeat a certain block of code while a condition is true. We learned why this tool is handy, and when you might use it instead of a for loop.
understandsWhileLoops = true
Now we’re ready for the next tool.
Today: Arrays!
In Chapter 10, we talk about arrays.
From Learn to Code 2: Arrays
An array is a list of items. In Swift, the items in the list will all have the same type. In our playgrounds, we might have an array of Characters or Ints (remember, these are whole numbers).
This is a heavily used tool in programming.
If you skipped ahead a little bit in the Rock, Paper, Scissors playground, you may have seen arrays in use and wondered what the square brackets (‘[‘ and ‘]’) were for, or some of the ways loops were used looked a little different than our for i in 1...n or while condition syntax.
We’ll learn all about the syntax of arrays; how to create them, change them, and use them.
We finished up logical operators yesterday with a little BuzzFeed-style quiz. Our code looked a little something like this:
show("What is your name?")
let name = ask("Name")
show("Hi " + name)
show("Answer some questions and I'll tell you what type of animal you are.")

show("Are you house-trained?")
var isHouseTrained = askForBool()

show("If I threw a ball would you chase it?")
var wouldChaseBall = askForBool()

//🦁🐱🐶🐺
if isHouseTrained && wouldChaseBall {
    print("You're a 🐶!")
} else if !isHouseTrained && wouldChaseBall {
    print("You're a 🐺!")
} else if isHouseTrained && !wouldChaseBall {
    print("You're a 🐱!")
} else if !isHouseTrained && !wouldChaseBall {
    print("You're a 🦁!")
}
Paste that into a Swift Playground on your iPad and try it out!
Today’s Session
Today we’re back with while loops.
They require a little more design thinking, and especially today’s playground, where we nest loops! This just means we’ll be running a loop inside of a loop.
Because this is a little bit of a leap, conceptually, we’re going to take our time and come up with some strategies for reading code that might help you. Not only will they make reading code someone else has written easier, they’ll make reading and explaining your own code later easier. And the tips will help you design your code better, before you even start writing a single line.
The second week we introduced loops and variables. We even started on conditional coding!
For the third week we continued with conditions, introduced types and initialization, and started functions with parameters.
Last week we dove deeper into functions with parameters and logical operators (which brought us back to conditional coding again). We dropped an extra video last week to try and help illustrate the usage of some of these concepts.
What’s up this week
This week I hope to start us off with a live debugging session. This is useful because it’s a scenario you’ll often find yourself in. You’ll have a chunk of code you need to walk through in order to hunt down a tricky bug or bad behavior.
After the debugging session we’re going to explore a great way to exercise our newfound skills with conditionals and logical operators. We’ll use The Code Hub’s version of the Answers playground, from our playgrounds feed.
We’ll quiz our friends and collect their answers in variables and then use conditional coding and logical operators to change what our answer to them is.
Later… more loops!
Later in the week we’ll continue with more ways to loop and then maybe squeak in the start of arrays: a handy way to store lists of things.
As with many of our sessions lately, yesterday’s was meaty. Logical operators are a whole new level in our programming toolbox.
We have the NOT operator, which is an exclamation mark (!) in front of a boolean variable, like !isOnGem. So if we are on a gem, that whole statement, the exclamation mark and all, will return false. Confusing? Sure, maybe a little. But we’ll get it with practice.
Then there’s the AND operator, which is two ampersands together (&&). This tests to see if both values are true. If one of them is false, the test will fail and return false. In code, it would look something like this: isOnGem && isBlocked. The only way this returns true is if we are on a gem and we’re also unable to move forward (that’s what the isBlocked tests).
Lastly, there’s the OR operator, which is two pipes next to each other (||). In this case, if one of the values is true, we’ll return true. The code looks like this: isOnGem || isBlocked. In this case, if either case is true… if we’re on a gem or we’re unable to move forward… or even both are true, we’ll return true.
Deep Breaths
The puzzles will require a bit of patience and sometimes a bit of trial and error to get a feel for combining conditions. But that’s what we’ll be practicing today.
Hopefully a few of the tricks we use to visualize the concept of logical operators will help you in today’s session!
We have covered a ton already this week, with our functions with added flair. You’ve been writing (and using) code that is super powerful because we can pass in parameters that change what the function actually does.
Hopefully you were able to build your own amazing game of Rock, Paper, Scissors. In our own version above we might have cheated a little by making an unbeatable unicorn. What did you do? Feel free to email us your creations at [email protected].
Logical Operators
Today we start on Chapter 8 of Everyone Can Code Puzzles, Logical Operators!
We’ll be talking about booleans again: values that are either true or false.
We’ll be introduced to the NOT (!) operator, which turns a boolean value into its opposite value. The AND (&&) operator, where two boolean values must be true for the condition to be true. And the OR (||) operator, which tests two booleans and if one of the booleans is true then the condition will consider itself true and execute that branch of the condition.
What this all means is that our conditions get can more sophisticated. With logical operators it allows us, especially with the && and || operators, to test multiple conditions at once.
Here in Ireland, you might check to see ifit’s raining AND if it’s not too windythen you would bring an umbrella, otherwise, you would leave the umbrella at home.
We’d write that condition a little like this, if it were code:
We don’t have it quite perfect (yet), but we’re pretty happy with our live streaming setup for our live coding sessions (weekdays at 1pm, Irish time).
Since we toyed with a few variations on the tech, we figured we’d write up what we went with, in the end, in case anyone else found it useful.
The Session
The basic session is about half an hour of coding and working through the material in the Everyone Can Code Puzzles book from Apple in Swift Playgrounds on an iPad. I tend to give a brief intro, on camera, to the session, then we dive into the iPad for exercises and illustrations of that lesson’s concepts.
It’s designed for kids from age 8 or so to 108, so long as they have an iPad and an internet connection. Ideally you’d have another screen, like a TV or laptop or other iPad to watch the coding session on while you follow along on the iPad.
The course material is geared towards people who have a limited understanding of what coding is. It introduces computing concepts in as painless a way as possible and is a great intro to programming.
The Gear
For the basics we have a MacBook Pro from 2015 running Catalina and a couple of our 2016 iPads we use in our Code Hub classroom for Swift Playgrounds and the Books app (and occasionally a couple Keynote slides). And I have an iPhone X that I use as my camera.
The recording setup
I bought a Shure MV 5 a few years ago and it works like a champ for a good quality external mic. The mic is just off camera, pointed at my face, and it’s very near where I work through the day’s code on the iPad.
I also have a 7-port, powered USB hub for charging and maintaining The Code Hub iPads, and it’s been pressed into service as my hub for connecting the iPads and iPhone, which has been a life saver if I need to change between multiple iPads and have all the other stuff connected, too.
Lastly, I have a USB-powered light/phone holder from TK Maxx (I still find it weird to say or type TK and not TJ). We bought it for a lark just before things shut down, but it’s been pretty great for lighting video calls and the sessions, as well as a camera mount.
The Software
I’ve floundered around most with the software for our setup, for sure. I tried a number of streaming apps for the Mac, including some that did multi-streaming, but in the end I really like OBS Studio’s feature set.
In the beginning, I just used OBS to stream to Twitch, and I used the scenes to switch between different elements, like an image I captured of a Keynote slide for the intro, video capture from my phone, connected by USB, just from the normal camera app previewing me, then the screen capture from the iPad.
Now I think I’ve got it a *little* better. I use OBS Camera, which has a plugin for OBS Studio and an app for the phone, which presents a much better video feed of me. My scene switching has gotten a little better, but I’m sure there are loads of tricks I’m missing.
OBS Studio is configured to save the recording to disk as well as stream it, in mkv format, which YouTube will accept. After each session I upload the saved video to YouTube and chuck it in the kids.code() playlist.
I watched this video to help me use the software a little better (but I could probably do with watching it again:
Audio Setup
Like I said, I’m not 100% sure I have my audio setup perfect, but it’s working well, for now.
I disabled my laptop’s mic and just use the external mic for my audio. I also mute the OBS Cameria mic, as you can see in this screenshot:
My opening Scene is the intro screen, which is just an image, that I put up when I start the stream. The Intro 2 group is my camera and a link screen I usually prepare the morning of the session with some tips for the day.
Once I’ve finished the intro I select Scene 3, which is the iPad(s), and I transition to that, and I’m off camera for the duration.
We’ve chucked a duvet up on an old clothes rack from Argos to help out with audio quality, and it does seem to damp the echo down a bit.
And that’s it! It’s not the most sophisticated stream in the world. It’s not the slickest. But I can run my classes online now, and I’ve had a ton of fun doing it.
We’ll keep going with our final playground page in Learn to Code 2 about functions with parameters today. We started on the page yesterday, but today we’ll finish off one of the few possible solutions, and then we’ll move on to yet another new playground.
Let’s Play a Game
After that quick review we’ll move on to our new playground: Rock, Paper, Scissors.
This is an amazing playground for encouraging interaction amongst your students and creativity. The students will build their own game of rock, paper, scissors with emoji and battle it out!
It’s usually one of the more engaging sessions in a class, and hopefully that translates to home, as well.