Creating an App Walk-Through for the Playgrounds App

Swift Playgrounds Icon

Creating a walk-through for Swift Playgrounds can sometimes feel like wrestling a bag of eels in a room with all the lights burnt out.

Walk-throughs are a great way to set up content that learners can go through at their own pace as if they had a very patient senior software engineer sitting beside them, walking them through the code. I’ve written a few on my Adventures feed (https://www.thecodehub.ie/playgrounds/) and they’re such a good way to help focus on specific app development techniques or tools people may have been asking about, but I’m not necessarily going to be there in the room with them.

There is a great WWDC talk from 2022, when the app launched, walking you through how to create content, but it’s not always so easy:

WWDC 22: Create engaging content for Swift Playgrounds: https://developer.apple.com/wwdc22/110349

I’ve recorded a video of many of these steps, and a few troubleshooting notes down below, even, about some common things you might want in your walk-through.

Walk-Through Surgery

First, you’re going to be doing some surgery inside your app’s folder structure, and they demo it using the Finder to create an App folder and they put everything in there, except for the Package.swift file, which is the file that tells the Swift compiler what the project should look like, how to build it, what to include, and all the rest.  

You should then create a Guide folder in the same folder that now contains the App folder (it’s also called a module, if you listen to the video above).

So your app looks like this:

MyApp.swiftpm/
    App/
        MyApp.swift
        ContentView.swift
    Guide/
        Guide.tutorial
    Package.swift

However, this isn’t going to display a walk-through, just yet.

In the Guide.tutorial file, you’ll need something that looks like this:

@GuideBook(title: "Get Started with App Walk-Throughs", icon: title.png, background: background.png, firstFile: MyApp.swift) {
    @Guide {
        @Step(title: "Get Started with App Walk-Throughs") {
            @ContentAndMedia {
                Our first test step...
            }
        }
    }
}

Even if you don’t have the title.png or background.png files, you need to have those parameters in the GuideBook().

This guide contents above is the bare minimum with which I’ve been able to get a walk-through to appear. From there you can follow all the advice and tips in the WWDC video above, and you’ll have a chance to build some amazing content.

Going Further 

Now, if you get to the stage where you want to add resources to your guide; images, localized strings, a glossary, you may run into some further issues getting that walk-through to display.

If you try to add a folder in Playgrounds called ‘Resources’ you’ll hit your first roadblock, because Playgrounds won’t let you, because that’s a reserved folder name.

So over to the Mac we go.

As I mentioned in a previous post, you can open Swift Playgrounds apps in Xcode on the Mac (https://www.thecodehub.ie/news/2024/06/19/moving-your-app-from-swift-playgrounds-to-xcode/). We don’t quite need to go that far, but there are some handy things Xcode will help you create if you want to build localized walk-throughs.

On the Mac, right-click or use the action menu to show the package contents of your app.

In the Guide folder, create another folder called Resources. Here we can drop images to display in the guide, like the title.png and background.png above.

If you do want to take the next step and add a localized strings file, just a warning, you will have to dive into the Package.swift file and add a property to the top level:

    defaultLocalization: "en",

(Or whatever your default localization will be.) Otherwise Playgrounds will complain that you need this key so it knows which strings to load for your walk-through.

If you Show Package Contents on the app and then double-click the Package.swift file. It should open up in Xcode, if you have that installed, and you’ll add that line above just beneath the name: “MyApp”, line.

Troubleshooting

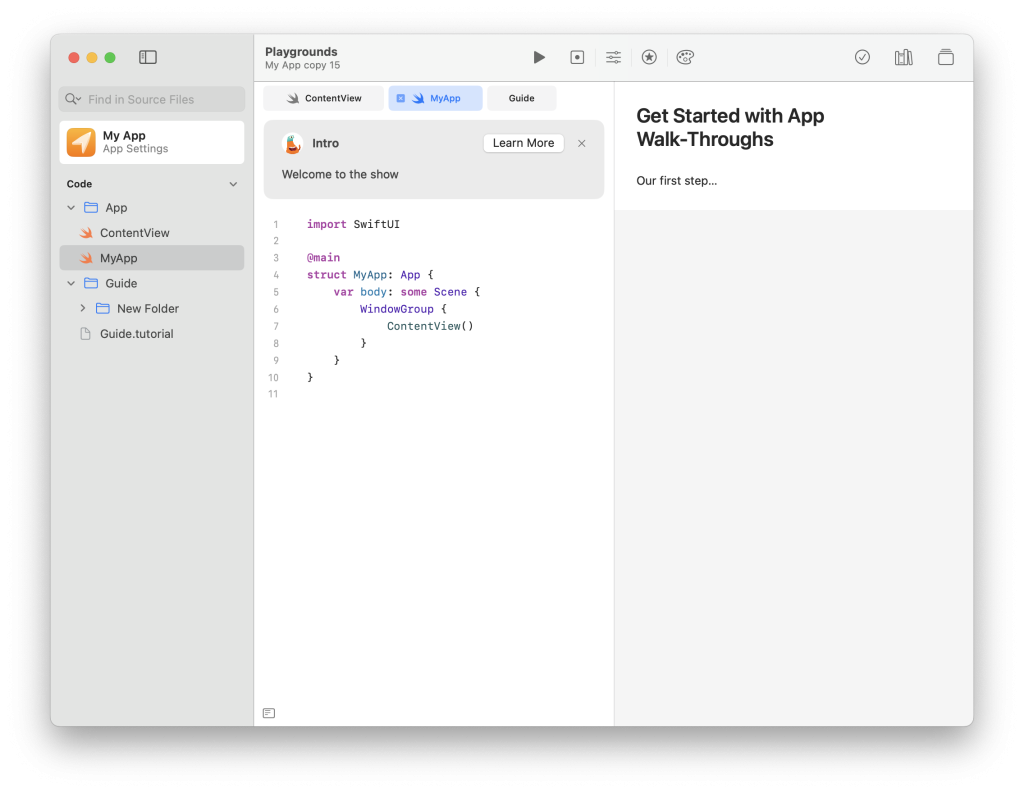
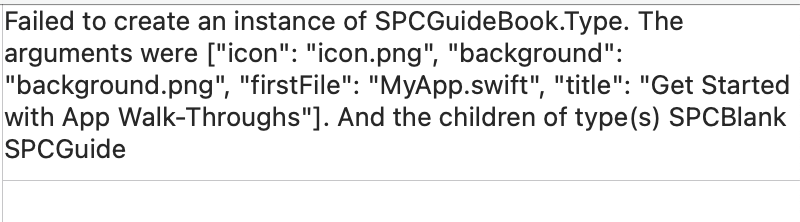
One of the things I always struggle with, when confronted with those “Failed to create… SPCGuideBook.Type” messages, is getting the welcome message to show. The thing I’ve found, to get a Welcome Message to show up properly, is that you need to pick a View file, I’m almost certain.

So if your tutorial file looks like this:

@GuideBook(title: "Get Started with App Walk-Throughs", icon: icon.png, background: background.png, firstFile: MyApp.swift) {
    @WelcomeMessage(title: "Get Started with App Walk-Throughs") {
        Welcome to the show
    }
    @Guide {
        @Step(title: "Get Started with App Walk-Throughs") {
            @ContentAndMedia {
                Our first step...
            }
        }
    }
}

it’s likely you’ll see the error message about it not being able to be loaded.

So you might try changing your tutorial file to look like this, instead (note the change in bold):

@GuideBook(title: "Get Started with App Walk-Throughs", icon: icon.png, background: background.png, firstFile: ContentView.swift) {
    @WelcomeMessage(title: "Get Started with App Walk-Throughs") {
        Welcome to the show
    }
    @Guide {
        @Step(title: "Get Started with App Walk-Throughs") {
            @ContentAndMedia {
                Our first step...
            }
        }
    }
}

Remember to close and reload your playground apps when you change the walk-through… that can be one of the biggest hassles about authoring app walk-throughs, but once you get a walk-through loaded it’s usually far, far easier to troubleshoot little missteps here and there.

Moving your app from Swift Playgrounds to Xcode

Swift Playgrounds Icon

There comes a time in every person’s life when they find they need to move from their beautiful little app they created in Swift Playgrounds to the big, bad world of Xcode.

Okay, maybe not every person’s life.

But there might come that time.

Getting it to your Mac

First off, you need to get the Playground app over to your Mac, and my personal favorite way is with AirDrop.

You can share your Playgrounds by tapping on the title, if you have it open in Playgrounds, or you can choose Select and then Share from the screen with all the playgrounds visible. Once you’ve AirDropped the app to your Mac, you’ll see a file that says (if you have show file extensions turned on) My App.swiftpm.

And you can open that in Xcode, by right-clicking on the file (or selecting it in the Finder and choosing the Action menu and selecting Open With… Xcode.app:

When?

But when would we want to do something like that?

More Features from our Development Environment

Well, sometimes we want to take advantage of some of the pro features Xcode has that Playgrounds doesn’t. Things like:

  • Powerful debugging capabilities;
  • Instruments for analyzing your app’s performance;
  • Simulators of all kinds of iPhone, iPad, Apple Watch, and other devices;
  • More information on the bigger screen of your laptop with navigator panes, inspector panes, preview canvas, code editors, and more;
  • Source control integration with platforms like Github…

Especially if we’re familiar with Xcode, we may be super comfortable with all the tools it has built in to help us build our apps quicker and more efficiently.

With this as our main reason, we’re still in pretty good shape. We can leave the app in its .swiftpm project file format.

When we do this, it means we can edit our app in Xcode on our Mac and then AirDrop it (or save it in iCloud) to edit on the iPad in Playgrounds, as well.

We Need More Advanced Features for our App

We can get incredibly far with Playgrounds and app development, even shipping apps all the way to the App Store and selling them!

But there are a few features of Xcode-based projects that might entice you to move over, or you might need to move over, to implement certain features in your app. For example:

  • Easier device and orientation support – Xcode projects make it easier to tick a box and restrict an app to iPhone Portrait view or any number of combinations;
  • Even more capabilities, like iCloud support, Apple Pay support, custom Fonts, Game Center…;
  • Multiple targets, Xcode Cloud support from the development environment;
  • Storyboards and UIKit support with Interface Builder

Making the Leap

If you do decide, yep, I want some of those extra features, so I’m moving to Xcode, just a word of warning: you can’t AirDrop an Xcode Project-based app back onto your iPad and work on it in Playgrounds.

In the video below, I show you one way to do this, and some ways to get out of the trouble you might find yourself in with some common issues that arise.

You can get pretty far with Swift Playgrounds. In fact, at the start of the video I show you how to add functionality to your Playgrounds app using packages, and the way to do the same in Xcode.

But if, for any of the reasons listed above, you feel like you need to move to Xcode, or just want to check it out, the video will help you see how that can be done.

Best of luck, and if it’s your first time using Xcode, welcome to the Show!

Irish EU Code Week Hackathon: Complete!

I’ve been involved with EU Code Week’s Irish hackathons for the last few years, and this year’s edition was a hybrid of online and in-person at Microsoft’s DreamSpace in Leopardstown Wednesday.

Pam and Julie did an amazing job running the event, as usual, and there was some great work done by the students.

On the first day I gave a little presentation on the App Design Journal and gave the students some tips straight from the App Design page, here, to help them organize their thoughts before they dove right into coding.

It’s a real highlight of the year, and show off what we can do with some of these transition year students in Ireland.

New Content! SwiftUI App Walk-Through in Swift Playgrounds

Well, it’s been a long time, but we finally have some new coding resources for you!

*But* you’ll have to toggle one little switch to make sure it works well for you, especially if your iPad or Mac is set to something other than English as its first language. We’ll get to that in a second, though.

SwiftUI App Walk-Through

For those of you who have been keeping up to date with Swift Playgrounds, you might have seen that it now supports these amazing walk-throughs in the app on the iPad (and Mac) that help introduce you to code.

And, like we did with Swift Playground Books, we can even author our own!

It’s a way to guide a student through an app and help them figure out how to either accomplish a task in an app or see how you did it.

Apple has some great examples that will show you how to make all sorts of magic, and if you look at the App Gallery you’ll learn how to perform animations in SwiftUI, configure your app’s navigation, build up views, and more.

Drawing Flags

A really fun activity to explore composing views is to look at the flags of the world and try and re-create them with simple colors… in some cases we can get more complex and start to add shapes like circles, triangles, stars.

In fact, there’s an exercise you can perform outlined in the App Design Workbook, which I’ve talked about before.

From the App Design Workbook, by Apple

I love that we have a good suite of exercises to practice our layout capabilities at our fingertips!

So I came up with a walk-through app called Drawing Flags. You can download it from the Code Hub Adventures feed in Swift Playgrounds, which you can subscribe to here (for free):

Subscribe to Adventures

The goal is to fill in implementations for as many flags as you possibly can.

The walk-through, which you access through the library icon in the top right toolbar of Swift Playgrounds, will show you how to make an Irish flag, and then how to make a Dutch flag.

You’ll learn to add cases to a switch statement, you’ll learn how to create new files to create your flag view in. You will make your flags look more polished by using view modifiers.

I would love to hear how you get on with it, so definitely send me feedback, as it’s a work-in-progress and we’ll have plenty of challenges coming soon.

Non-English Languages

The one issue, at the moment, is that you might see the following if you have your iPad set to something other than English, as the main language:

A screenshot of Drawing Flags in Swift Playgrounds with some errors in the walk-through pane.

You can fix this, for now, by turning on Author Debug mode in Swift Playgrounds.

** If you prefer video, the instructions/walk-through for this process is available in this video.**


Open up the Settings app on your iPad.

Scroll down to the bottom of the tableview on the left of your iPad (if you’re in a left-to-right language locale).

You should see an item in there for Playgrounds. Tap to open it.

There’s a switch you can toggle above the version information for Author Debug Mode. Turn that switch on. Then try reloading the Drawing Flags app in Swift Playgrounds and you should be good to go!

Enable Modalità creazione debug on your Italian iPad

Teaching Code: A New Series

Almost by accident, I started a new live stream today. I’m not 100% sure of the hours or the timing of these, but the videos will be available in the Teaching Code playlist, because that’s the goal of these sessions: to show you all the resources available on your iPad for teaching code.

This should be especially useful for schools who have an iPad one-to-one programme and teachers who have some creative students who want to add another tool to their toolbox.

SwiftStudentChallenge 2022!

It’s that time of year again, and we have such a limited time!

The Swift Student Challenge is on and it’s a great opportunity to push yourself to create something of which you can really be proud.

Now, the deadline is April 24th at midnight (Pacific time, but, as I say in the video, I would encourage you to push for your own local midnight… something always goes sideways at the end and you want to have plenty of time).

The challenge, this year, is centered around Swift Playgrounds 4, and its ability to build full-fledged apps!

I threw together a little video to help you read the T&Cs and maybe find a path towards an app you can really get stuck into. Check it out here:

And here are a few links to help get you on your way…

Swift Student Challenge: https://developer.apple.com/wwdc22/swift-student-challenge/

The full T & Cs for the Swift Student Challenge: https://developer.apple.com/wwdc22/swift-student-challenge/policy/

Apply now: developer.apple.com/wwdc22/swift-student-challenge/apply

For students younger than 13 in the US or 16 in Europe, get your guardian to email [email protected] allowing you to apply.

Getting Started

Swift, Apple’s Open Source Language: https://www.swift.org

Swift Student Challenge on the Developer Forums: https://developer.apple.com/forums/tags/swift-student-challenge/

App Gallery Tutorials: https://developer.apple.com/tutorials/sample-apps

Inspiration from past winners: https://www.wwdcscholars.com

Themes

These are not the only themes you could use for inspiration or focus, but they’re a good start:

The Process

App Design Journal: https://education-static.apple.com/coding-club-kit/appjournal.key

App Design Workbook: http://education-static.apple.com/coding-club-kit/appworkbook.key

Best of luck!

Swift Playgrounds Author Template for Xcode 13!

Swift Playgrounds Icon

Woohoo! https://developer.apple.com/download/all/?q=swift%20playgrounds

Apple’s updated the Swift Playgrounds Author Template for Xcode 13, which is huge news for people (like me) who author Swift Playground Books.

I’ve talked in the past about building playground books with the author template (the video is here). It’s a great tool for helping you build rich experiences for your students.

With this new download, you can build your playground book without having to keep Xcode 12 around. Now, the template is reliant on a certain version of Swift, so you may need to install a separate build of Swift (which you can get from here: https://www.swift.org/download/), and I’ll go into how to do that (and maybe *why*) at a later date.

In the meantime, I’ve got to go grab my copy to get cracking on a few new Swift Playground books!

Swift Playgrounds 4.0: Christmas Come Early!

Swift Playgrounds Icon

Well, it’s finally here: Swift Playgrounds 4.0!

You can now build entire apps on your iPad and ship them to the App Store. This is a huge update and there’s a ton of great content to go with the update that will teach you how to build apps (with SwiftUI, even!).

Go check it out and I’m sure I’ll have some walk-throughs for you soon!

Prototyping Swift Playground Books

Swift Playgrounds Icon

While you’re waiting, with bated breath, for Swift Playgrounds 4.0 to ship, you might be playing around with Swift Playgrounds, whether it’s on a Mac or on an iPad.

This app and Swift Playgrounds (and Swift Playground Books, which we can author, ourselves — see our two videos on authoring playgrounds with the author template and by copying another book) are amazing tools for teaching coding.

Prototyping

But we talk a lot about prototyping when we talk about building apps. The App Design Workbook and App Design Journal teach you how to use Keynote to prototype an app experience quickly so that you can prove out your ideas and flow before you pour out the blood, sweat, and tears on the actual app.

This saves us from a lot of work that might be for nothing if our core idea isn’t all its cracked up to be. Prototypes let us figure out if there’s something there and whether it’s worth investing the time to develop the idea out into an actual app.

Well, the same thing applies when you’re building Swift Playgrounds and especially Playground Books. These are like stories and games and instruction all bundled into one package, so of course there’s a lot of complexity there.

Keynote

I created a little Keynote theme that might help you storyboard out your Swift Playground Books, which you can download from here. Simply download that file an unzip it and double-click it, and it’ll install the template for you to use when you create new Keynote files.

It’ll give you a title screen first, and when you add new slides to the presentation you should choose the Playground Prototype slide type, and it’ll give you an area for prose in the upper left hand corner, an area below for code students might run on that particular page, and a dummy live view on the right hand side where you can sketch out what the code drives.

This way, just like an app, you can storyboard out your whole book experience and see how people will flow through the book. You can pinpoint what coding techniques you want to show off or teach or enable on a given page, as well as any instruction or story you might tell on each page.

Hopefully you find this useful, like I have!